The challenge
Today I’d like to tell you about my first CTF challenge, at the OVHcloud 2024 Hackathon (internal event).
Of all this Hackathon challenges I took part in, this was the one that made the biggest impression on me. I found it both interesting and fun. I particularly liked its simplicity: the problem is very quick to understand, but requires several steps to solve.
It consists of this simple web page:
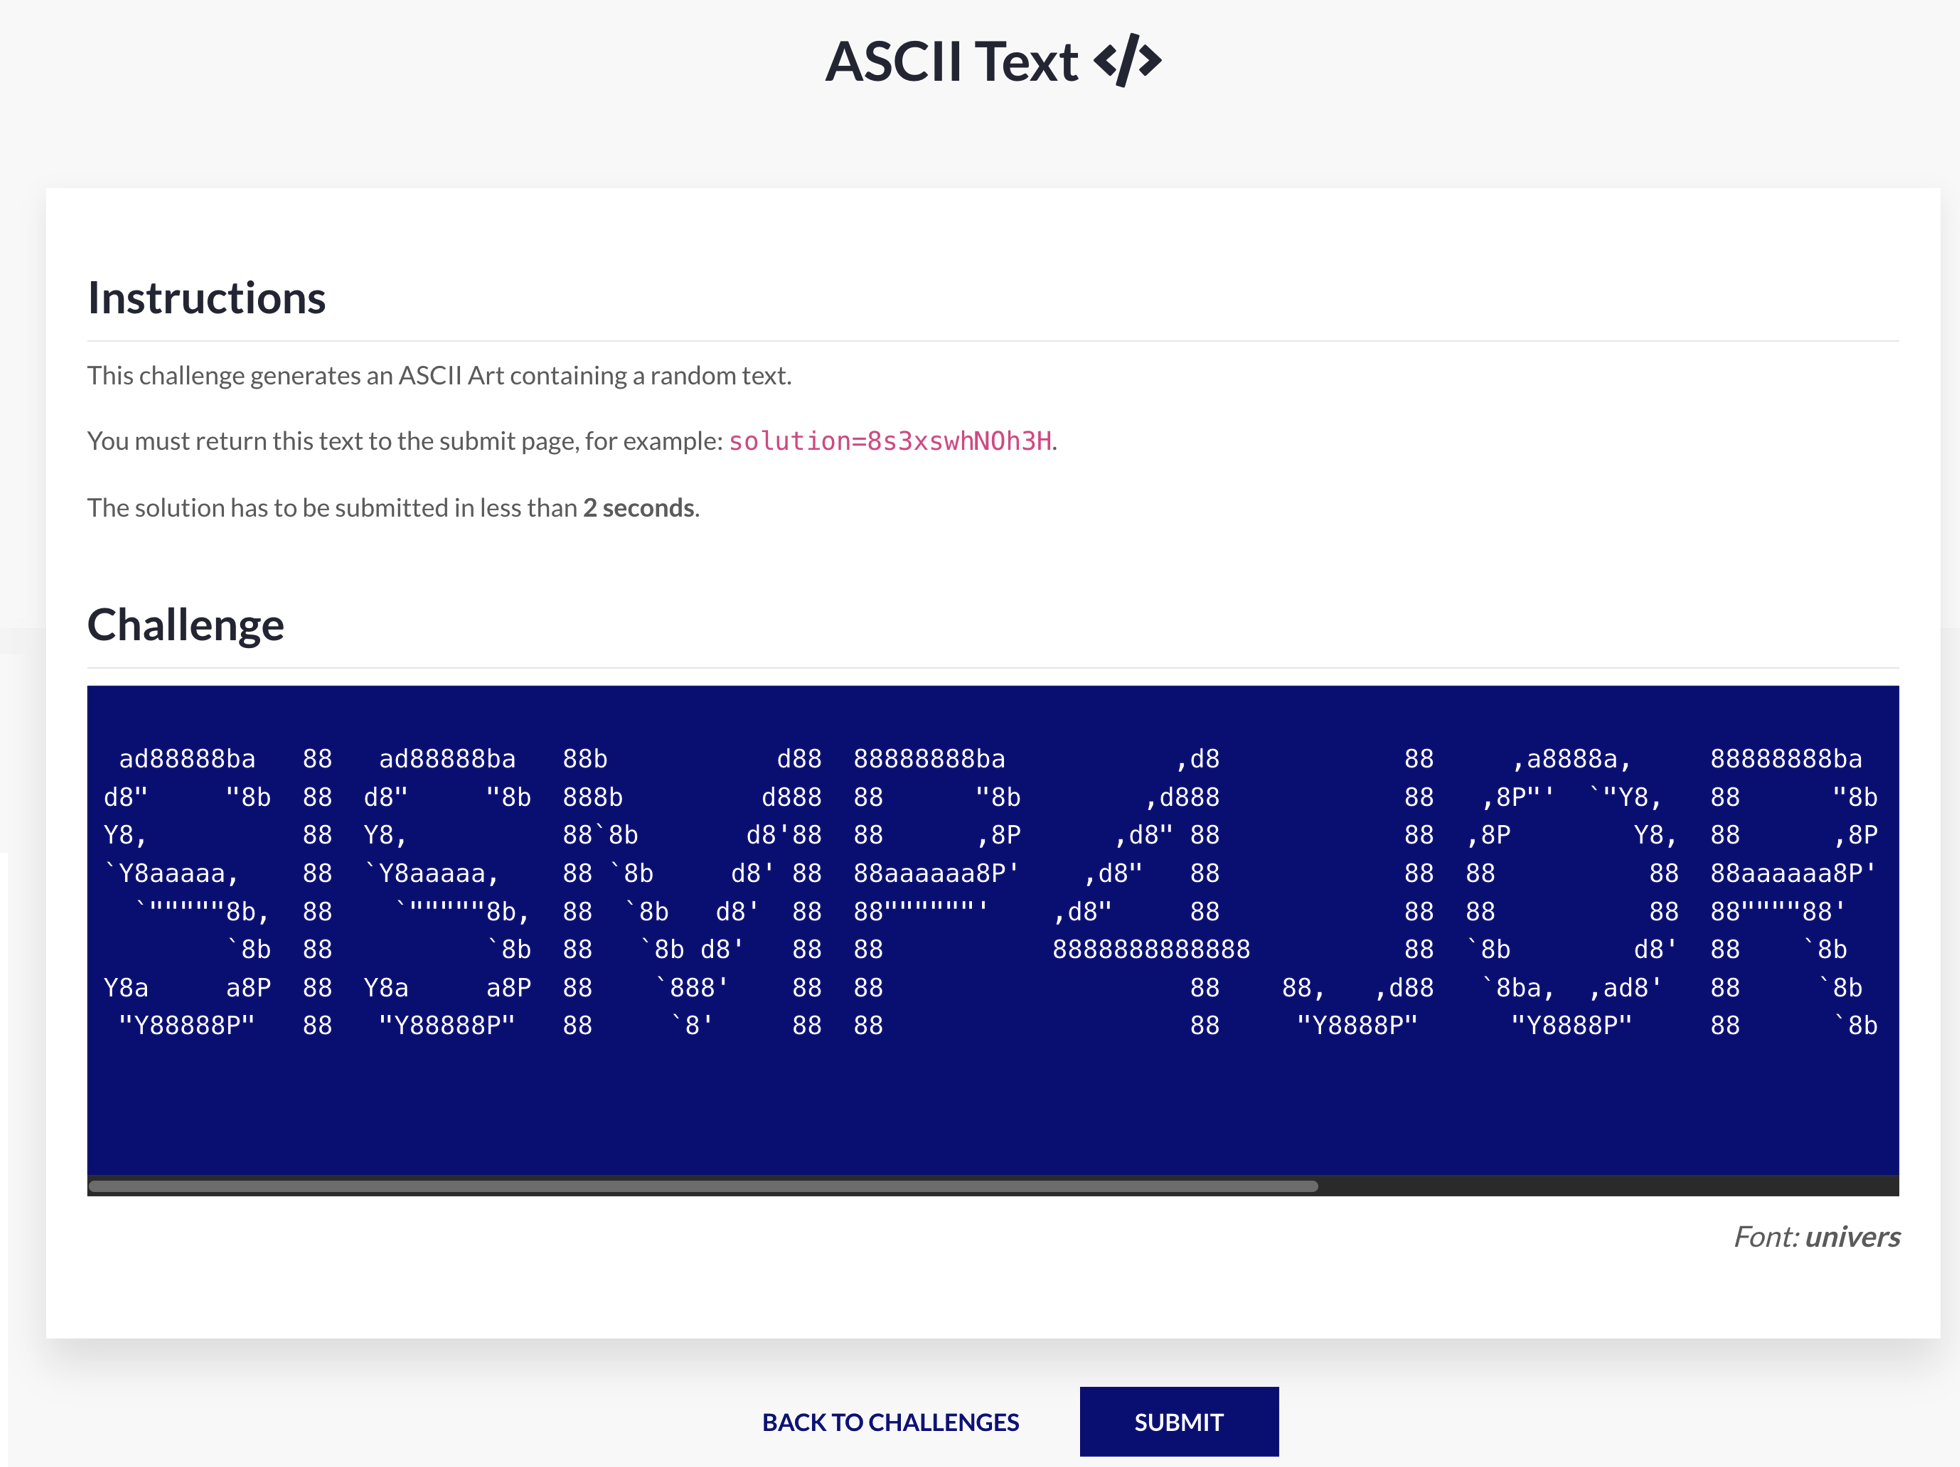
Okay, it’s all written down. There is a code that appears in ASCII art. I have to send this code back via the submit URL in less than 2s. Totally impossible for a human, so I’m going to have to automate the process.
Taking information
The very first step is to eliminate the variables and obtain as much information as possible. By refreshing the web page a few times and looking at the HTML code, I get my answers.
How many characters?
There are always 12.
Is the font always the same?
No. There’s a lot of different fonts every time. This will add another difficulty.
Is the corresponding code present somewhere in the HTML code of the web page?
Of course not, but it was worth checking.
The steps
That said, it’s time to automate the process. Let’s ask ourselves a question: there are tons of tools in the software world that can generate ASCII art from characters, but does the reverse exist?
To be honest, I don’t have much hope that it does. The usefulness of such a system being very limited, I doubt that many people have had fun programming this sort of thing, except for a challenge.
But to be even more honest, I didn’t even really feel like looking for it, as I had a more interesting idea in mind.
Have you ever heard of OCR? It stands for Optical Character Recognition. These are tools based on deep learning that specialise in recognising characters, words or sentences in visual contexts.
They are used in tools that surround us every day, such as recognising postcodes on envelopes, generating PDF documents from a photo of a text, automating the verification of identity documents, reading photos of speed cameras or even aids for the blind or partially sighted.
That’s exactly what we need, isn’t it? Yes, but we’ll need to go through several stages.
First of all, the ASCII art on the web page is not an image but a set of characters displayed.
Secondly, we’re not interested in the whole web page, just the part containing the ASCII art.
Finally, the idea would be to take a screenshot of this part of the web page and send it to OCR.
Without having any specific knowledge of OCR, and even if I have a modicum of confidence in how it works, if there’s one thing I’ve always learned in AI, it’s that data pre-processing is as important as, if not more important than, deep learning processing itself.
The data is an image, so we’re going to have to do a minimum of image processing.
If I’ve got it right, my plan is perfect: all that’s left to do is send the OCR output in the submit request.
So here’s the plan:
- Retrieve the web page via an HTTP GET request
- Do some web scaping on the web page in order to extract only the part that interests us (the ASCII art)
- Generate an image from the ASCII art
- Do some image processing in order to make it more easily readable for an OCR. Here I will just put the drawing in black on white, playing on contrasts to make it sharper
- I give the image to the OCR
- Finally, I retrieve the result in order to stick to the submit request
- All that remains is to read the result
Let’s start the challenge
Web scraping
I decide to use the Python language which is the most suitable and simple for what we want to do.
Using the Requests library, I get the full web page content.
|
|
Then I parse the content using BeautifulSoup.
There is only one <pre> tag in the HTML code. This tag represents preformatted text which is to be presented exactly as written in the HTML file. It’s this one that provides the data that interests us.
|
|
After a few tries, this is what’s displayed on my terminal:
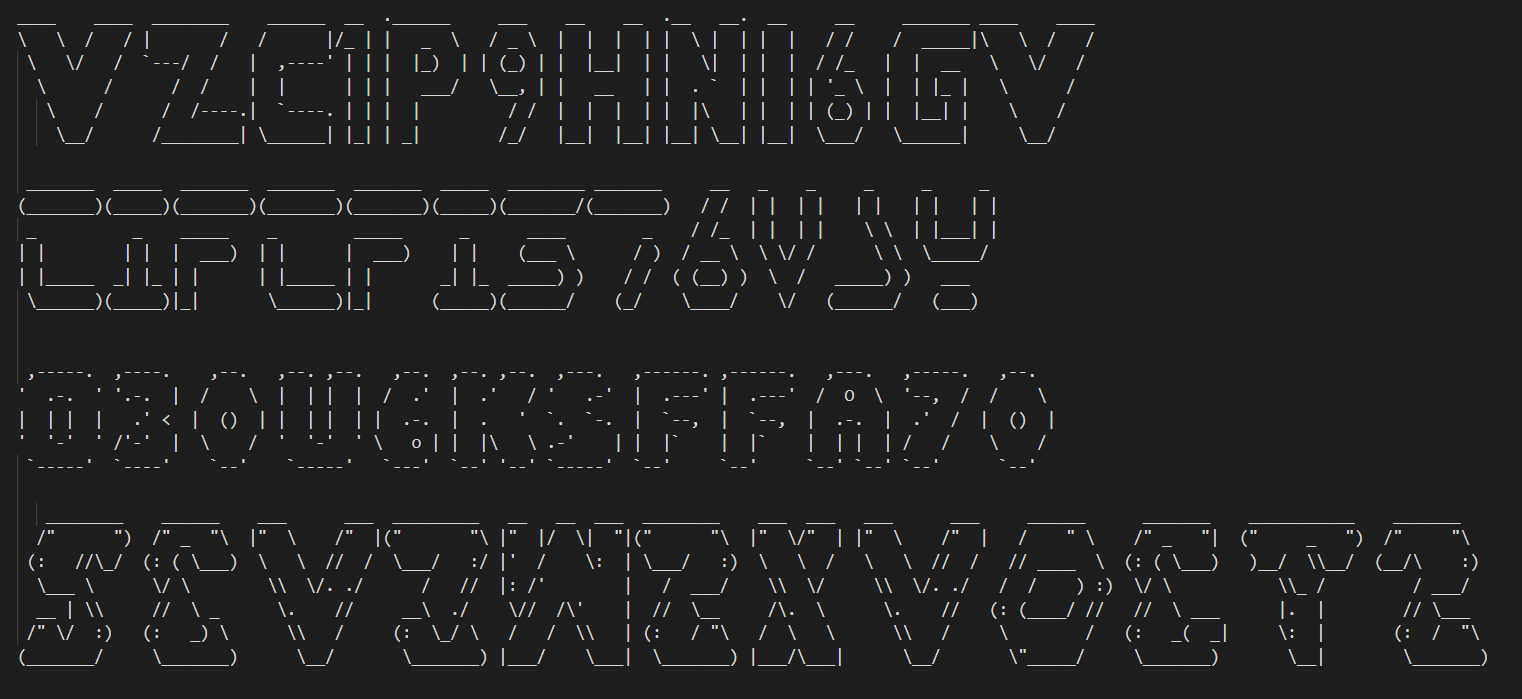
Image processing
Now, let’s move on to image processing. I first thought of OpenCV. But since it took ages to install on my laptop, I found another image processing library that I didn’t know about: Pillow. From what I’ve read, it’s certainly more limited in features but much lighter, and faster on simple processing. Exactly what I need, let’s try it!
Firstly, I created the image from the output:
|
|
Then, defined a preprocessing function:
|
|
All that’s left to do is call my preprocessing function:
|
|
Here are some results:


Hey, that’s pretty nice! All the preliminary steps are completed, now we have the central part of our solution: the OCR.
Optical Character Recognition (OCR)
If I immediately thought of an OCR when I started this challenge, it’s because I already knew one that I had played with a little several years ago: Tesseract OCR. This OCR, developed by Google, has a very high success rate, I had already made my choice. It turns out that there is a Python wrapper of this library: pytesseract.
This library is very easy to use and turnkey. You give it an image containing a text, it gives you the text. Easy.
So let’s write it:
|
|
Let’s see the results!
The image:
The result:
|
|
Uh oh. It seems something went wrong.
You know, I’m just a developer. Sometimes I don’t read the entire documentation.
If I had, I would have known an important things about Tesseract OCR: there are 13 operating modes, and the default operation is not at all what I needed.
The default one is PSM 3: Fully Automatic Page Segmentation, But No OSD. (OSD stands for “Orientation and Script Detection”. It’s a feature in Tesseract that automatically detects the orientation of the text in an image and attempts to identify the script used)
In this mode, Tesseract will automatically segment the page and try to recognize the text.
Here are some good modes to know:
-
PSM 5: Assume a single uniform block of vertically aligned text
Tesseract will assume the input image contains a single block of text, such as a paragraph or a page with a uniform font size and structure. -
PSM 6: Assume a single uniform block of text
Similar to PSM 5, but this mode assumes that the block of text is more likely to be horizontally aligned. This is often useful for images that are simple and contain a single block of text. -
PSM 7: Treat the image as a single text line
Tesseract assumes that the input image contains just a single line of text, which can improve accuracy when working with smaller inputs. -
PSM 8: Treat the image as a single word
Tesseract treats the input image as containing just a single word. This mode is helpful for recognizing single, isolated words.
Have you guessed which mode we are going to be interested in here?
PSM 8 mode of course!
This mode is set via the --psm 8 option
I also understood something else about the default operation of Tesseract, it’s that it will look for the correspondence between the words it reads and that of a dictionary, English by default.
Here it does not interest us and we do not want Tesseract to be influenced by any dictionary, but that it interprets what it reads character by character.
This is set by the -c option
Better yet, Tesseract offers the ability to limit the character recognition domain to a whitelist. So I give it the characters a-z, A-Z and 0-9.
So here is the code to call pytesseract, with the correct configuration:
|
|
Let’s test it:
The image:
The result:
|
|
Finally, we got our result!
Capture the flag
I would have liked to tell you that I measured the exact time of the whole operation, but I confess that in the heat of the moment I didn’t think about it at all. I clearly didn’t choose the fastest technologies anyway, but what I can tell you is that it took less than two seconds.
The process duration being respected, I just have to add the result in the submit request, I add a condition that invalidates the result of Tesseract if the found word is not exactly 12 characters long just in case, and that’s it!
|
|
Response:
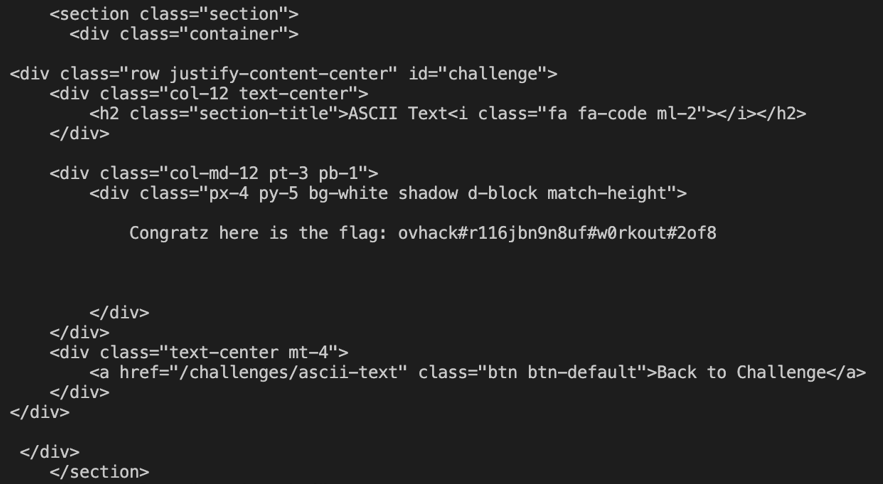
Flag captured, let’s go to the next one!
Once again, a very big thanks to OVHcloud and all the organisers of this Hackathon, who gave my colleagues and I a wonderful time ♥